Unraveling Azure Virtual Networks: An Insightful Series - Part 1
Hello and welcome to the first part of our focused series on Azure Virtual Networks (VNet). I'm Tycho Loke, a Microsoft Consultant at PeopleRock, and I'll be your guide through this exploration.
Azure Virtual Networks, the backbone of your private network in Azure, provides seamless and secure communication among Azure resources and the broader internet, mirroring a traditional network in your own data center but with the added perks of Azure's infrastructure: scalability, availability, and isolation.
In this series opener, we will dive into the basics of Azure VNet, including its use cases, limitations, and interplay with Azure's availability zones. Furthermore, we'll walk you through a step-by-step guide on setting up a virtual network using the Azure portal, establishing virtual machines, and employing Azure Bastion for secure connectivity.
Join us on this journey as we peel back the layers of Azure Virtual Networks. Let's dive in!
Why Choose Azure Virtual Network?
Azure VNet isn't just a network; it's a robust and secure framework facilitating seamless communication. It allows Azure resources to interact securely with each other, the internet, and on-premises networks. But why exactly should you opt for Azure VNet?
- Inter-resource Communication: Azure VNet enables Azure resources to connect with each other, promoting a harmonious cloud ecosystem.
- Internet Communication: It helps Azure resources to connect securely with the internet.
- On-premises Network Communication: Azure VNet is the bridge that connects your Azure resources and on-premises networks, ensuring seamless communication.
- Network Traffic Management: Azure VNet excels in filtering and routing network traffic, ensuring optimal performance and security.
- Integration with Azure Services: It allows for straightforward integration with other Azure services, increasing the functionality of your Azure environment.
Create an Azure Virtual Network with Azure Portal
Creating a Virtual Network (VNet) in Azure is a foundational step in constructing a private network within the cloud environment. VNet allows Azure resources, such as Virtual Machines (VMs), to communicate securely among themselves and with the internet. This Quickstart Guide will walk you through the process of creating a VNet using Azure Portal, creating two VMs within the network, and deploying Azure Bastion for secure connectivity and communication between the VMs.
Prerequisites
To follow this guide, you need to have an active Azure account. If you don't have an Azure account yet, you can create one for free here.
Creating an Azure Virtual Network
Below are the steps to create a virtual network with a resource subnet, an Azure Bastion subnet, and an Azure Bastion host:
- Sign in to Azure Portal: Start by signing in to your Azure Portal account.
- Select Virtual Networks: In the Azure Portal, search for and select 'Virtual Networks.'
- Create a Virtual Network: On the 'Virtual Networks' page, click on 'Create.'
4. Provide Basic Information: On the 'Basics' tab of the 'Create virtual network' screen, enter the following information:
- Subscription: Keep the default or select a different one as per your needs.
- Resource Group: Click on 'Create new' and name the resource group 'TestRG'.
- Virtual Network Name: Type 'VNet' as the name.
- Region: Keep the default or select a different region for your network and all its resources.
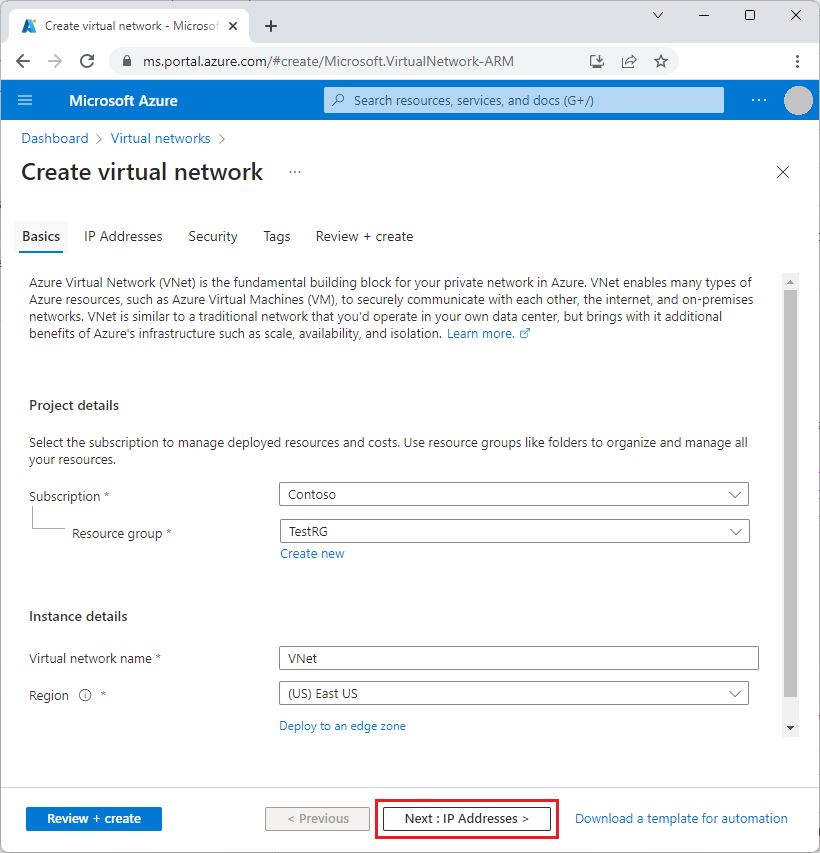
5. Set up IP Addresses: Navigate to the 'Next: IP Addresses' at the bottom of the page. Under the 'IPv4 address space' on the 'IP Addresses' tab, click on the trash bin icon to delete any existing address space and then type in '10.0.0.0/16.'
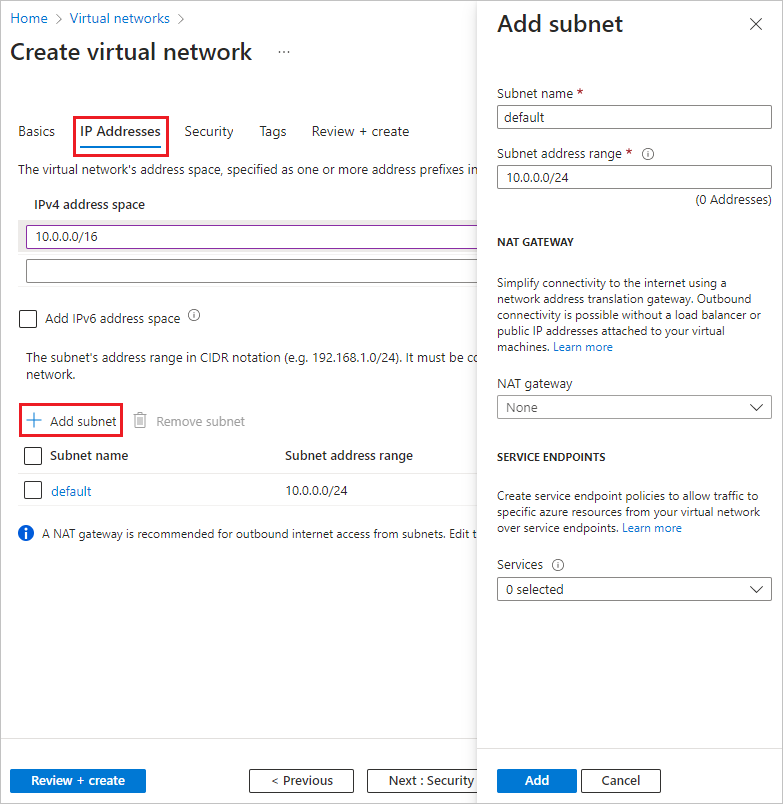
6. Add Subnet: Click on 'Add subnet.' On the 'Add subnet' screen, provide the following information and then click 'Add':
- Subnet Name: Enter 'default.'
- Subnet Address Range: Type '10.0.0.0/24.'
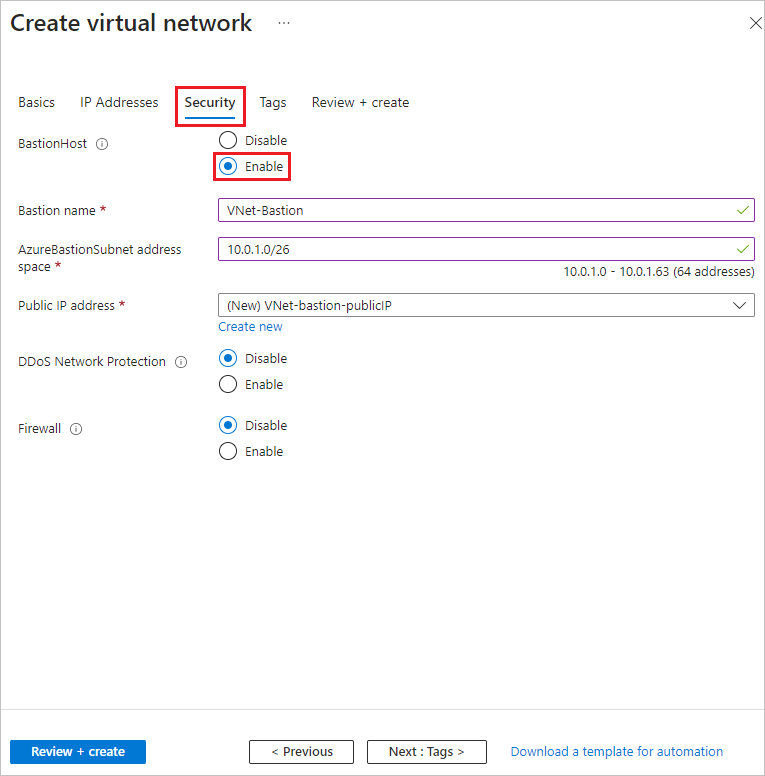
7. Enable Security: Go to 'Next: Security' at the bottom of the page. On the 'Security' tab, click 'Enable' next to 'BastionHost.'
8. Set up Azure Bastion: Azure Bastion lets you connect to your VMs over secure shell (SSH) or remote desktop protocol (RDP) through your browser using their private IP addresses. The VMs do not require public IP addresses, any client software, or specific configurations. Provide the following information:
- Bastion Name: Type 'VNet-Bastion.'
- AzureBastionSubnet Address Space: Enter '10.0.1.0/26.' Azure will automatically create the AzureBastionSubnet subnet.
- Public IP Address: Click 'Create new,' then type 'VNet-bastion-publicIp' under 'Name,' and click 'OK.'
9. Review and Create: Click on 'Review + create' at the bottom of the screen. After the validation passes, click 'Create.'
That's it! You have now successfully created a Virtual Network in Azure using Azure Portal.
Creating Virtual Machines in the Azure Virtual Network
Once you have set up your Azure Virtual Network, the next step is to create two Virtual Machines (VMs) named VM1 and VM2. Here's how you can achieve this:
- Select Virtual Machines: In the Azure Portal, search for and select 'Virtual machines.'
- Create a Virtual Machine: On the 'Virtual Machines' page, click on 'Create' and select 'Azure virtual machine.'
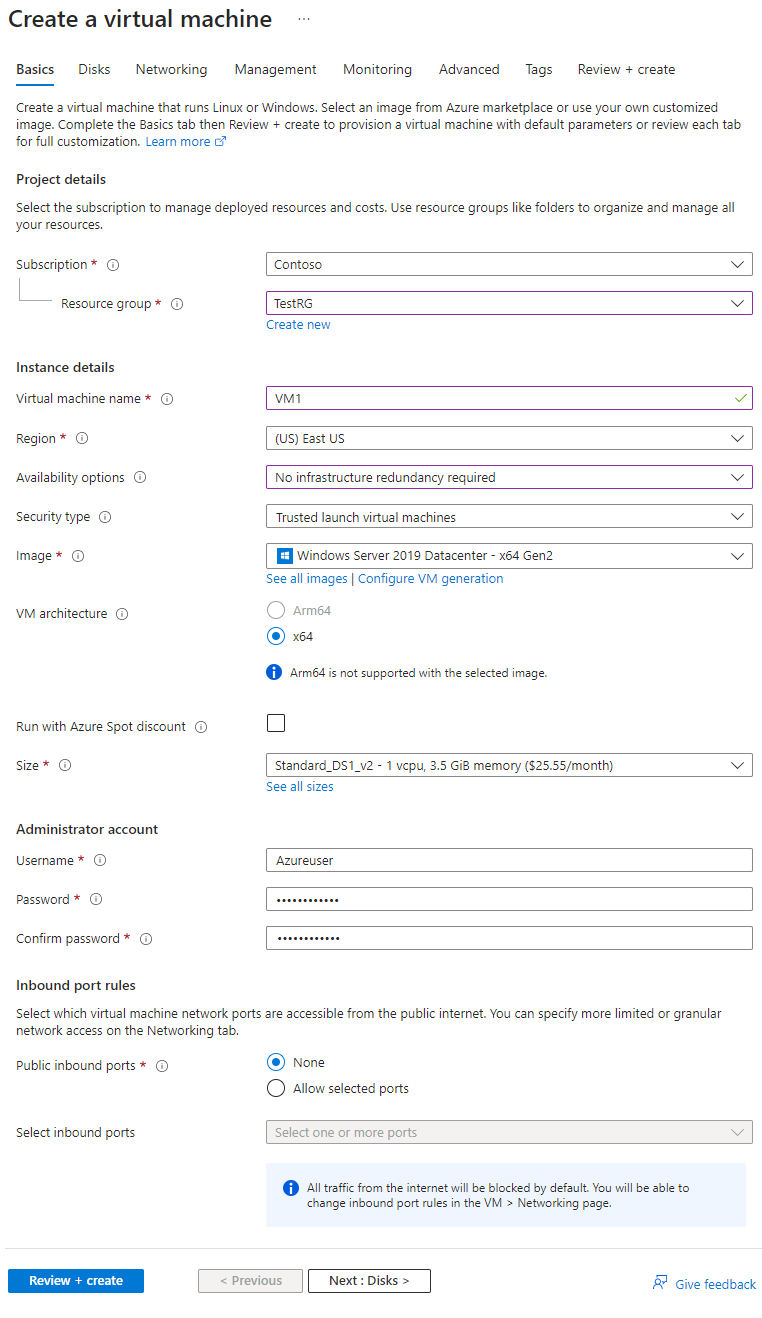
3. Provide Basic Information: On the 'Basics' tab of the 'Create a virtual machine' screen, enter the following values:
- Resource Group: Select 'TestRG' if it's not already selected.
- Virtual Machine Name: Type 'VM1.'
- Region: Select the same region as your resource group and virtual network if not already selected.
- Availability Options: Choose 'No infrastructure redundancy required.'
- Image: Pick 'Windows Server 2019 Datacenter - x64 Gen2.'
- Size: Accept the default size, or choose a different size from the drop-down menu.
- Username, Password, and Confirm Password: Input an admin username and password for the VM.
- Public Inbound Ports: Select 'None.'
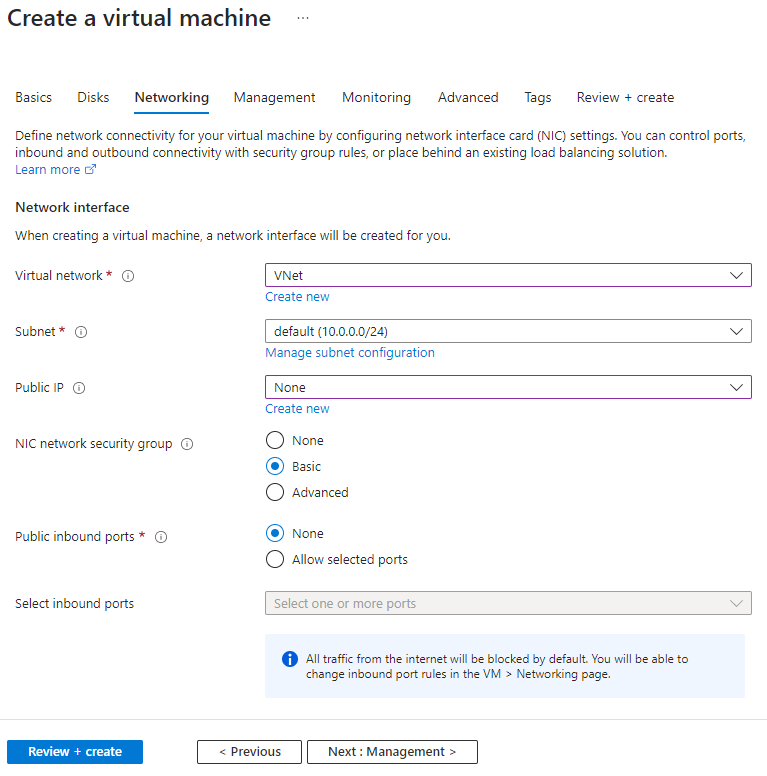
4. Set up Networking: Click on the 'Networking' tab at the top of the page. On the 'Networking' page, enter the following values:
- Virtual Network: Choose 'VNet' if it's not already selected.
- Subnet: Select 'default' if not already selected.
- Public IP: Choose 'None.'
5. Review and Create: Accept the other default settings, and click on 'Review + create.' Review the settings, and then click 'Create.' The VM creation process might take a few minutes.
6. Create a Second Virtual Machine: After the VM1 creation is complete, you can create the second VM. Click on 'Create another VM,' name the VM 'VM2,' and keep all the settings the same.
Now, you have successfully created two VMs, VM1 and VM2, within your Azure Virtual Network. Both of these VMs are ready to be securely accessed over SSH or RDP using Azure Bastion.
Connecting to a Virtual Machine
Having created your VMs, the next step is to connect to them. In this section, we'll illustrate how to connect to the VM named VM1 using Azure Bastion.
- Navigate to Virtual Machines: In the Azure Portal, search for and select 'Virtual machines.'
- Select VM1: On the 'Virtual Machines' page, click on 'VM1.'
- Select Connection Method: At the top of the VM1 page, click the dropdown arrow next to 'Connect,' and then select 'Bastion.'
- Provide Credentials: On the 'Bastion' page, enter the username and password you created for the VM, and then click 'Connect.'
Now, you're securely connected to your VM1 via Azure Bastion. This connection does not require any public IP addresses or special client software. It's a secure and straightforward way to interact with your Azure VMs.
For the next steps, you can execute your required commands or deploy your applications on this VM. Remember to disconnect from the VM once you have finished your tasks to maintain security.
In the next section, we'll illustrate how to connect to VM2 and enable communication between the two VMs in your Azure Virtual Network. Stay tuned!
If you want to know more about Azure Networking feel free to contact me:
Contact me via,
Mail: tycho.loke@peoplerock.nl
Phone: +31 6 39 41 36 65
LinkedIn: Tycho Löke

