Unraveling Azure Virtual Networks: An Insightful Series - Part 2: Deep-Diving into Azure Virtual Machines and Networking
Welcome back, cloud enthusiasts! This is Part 2 of our enlightening series 'Unraveling Azure Virtual Networks'. In this installment, we delve deeper into Azure's world by creating and configuring Azure Virtual Machines (VMs) and setting up an effective Azure networking environment. Plus, we'll get a sneak peek into advanced VM configurations. So, let's get started!
Getting Started with Azure Virtual Machines
Azure Virtual Machines are scalable computing resources offered by Microsoft Azure. They simulate a computer system and offer complete software functionalities, giving you control over your computing environment. Today, we'll walk you through the process of creating and configuring these resources within your Azure Virtual Network.
Creating Your First Virtual Machine
To create two virtual machines named VM1 and VM2 in the virtual network, follow these steps:
- Go to the Azure portal and search for "Virtual machines."
- Select "Virtual machines" from the search results.
- On the Virtual machines page, click on "Create" and choose "Azure virtual machine."
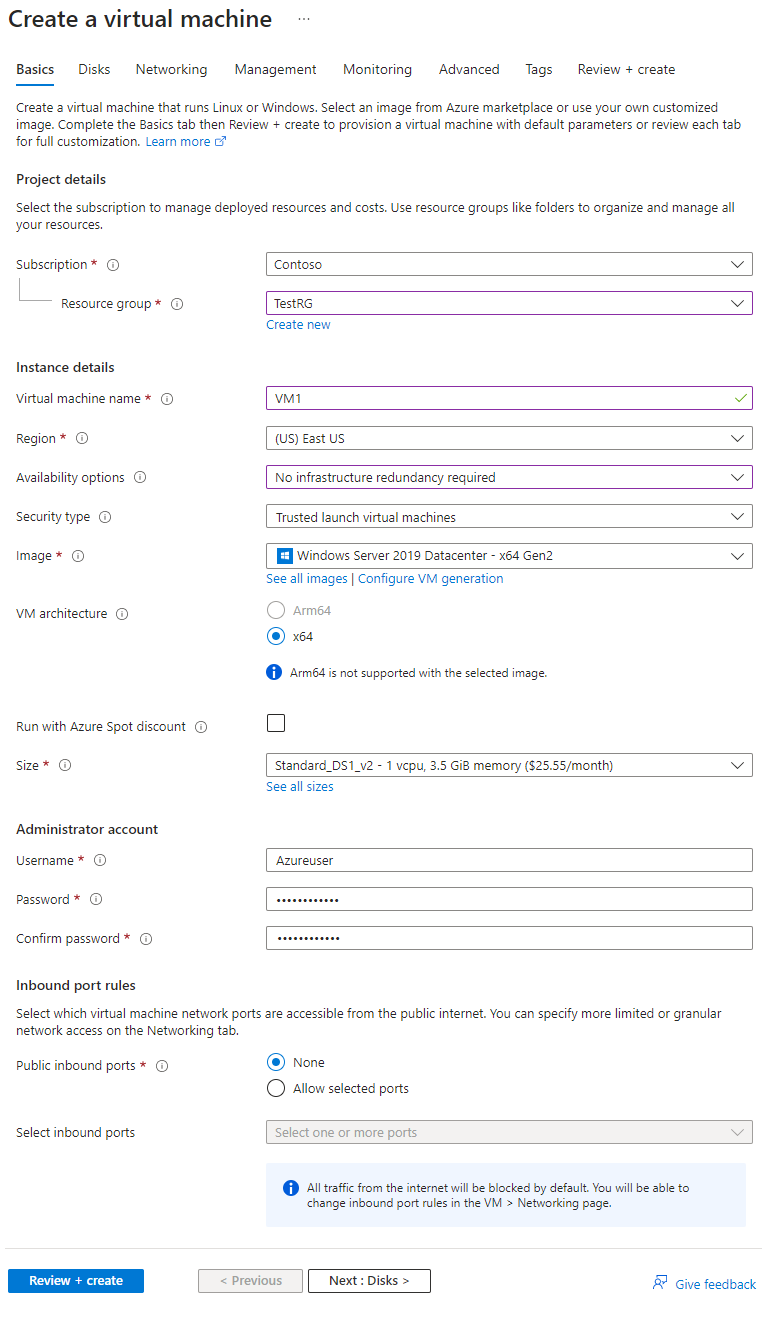
- On the Basics tab of the Create a virtual machine screen, provide the following information:
- Resource group: If it's not already selected, choose "TestRG" from the drop-down menu.
- Virtual machine name: Enter "VM1" as the name for the first virtual machine.
- Region: Select the same region as your resource group and virtual network. If it's not already selected, choose the appropriate region from the list.
- Availability options: Select "No infrastructure redundancy required" from the options.
- Image: Choose "Windows Server 2019 Datacenter - x64 Gen2" as the image for the virtual machine.
- Size: You can either accept the default size or click on the drop-down menu to choose a specific size for your VM.
- Username, Password, and Confirm password: Enter an administrator username and password for the virtual machine.
- Public inbound ports: Select "None" to restrict access to the VM from public networks.
5. Select the "Networking" tab located at the top of the page.
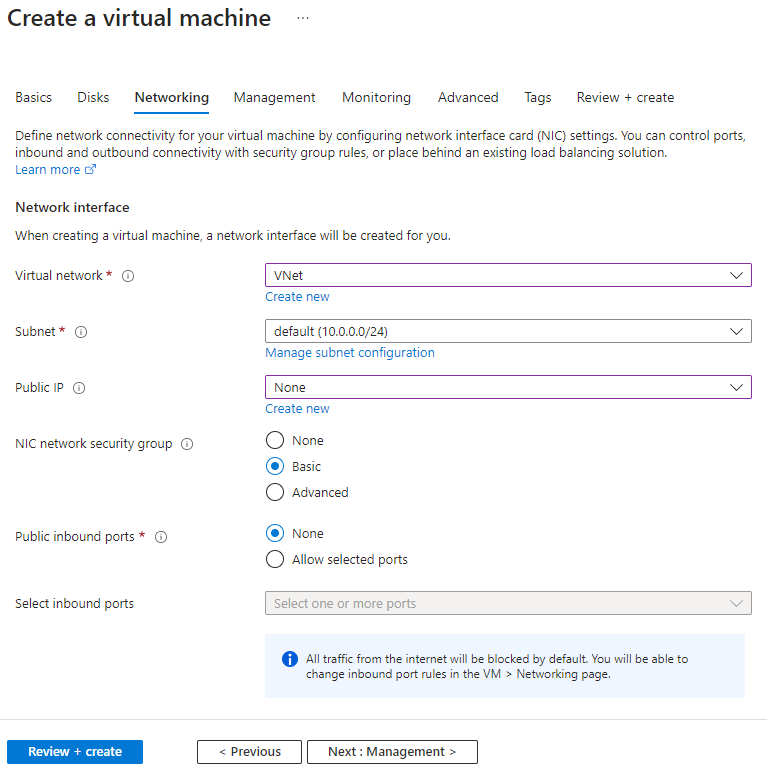
6. On the Networking page, enter or select the following values:
- Virtual network: If it's not already selected, choose "VNet" from the available options.
- Subnet: Select "default" if it's not already selected as the subnet for your virtual machines.
- Public IP: Choose "None" to disable the assignment of a public IP address to the virtual machines, thereby restricting their access from public networks.
7. Accept the remaining settings without making any changes.
8. Click on "Review + create" to proceed. Take a moment to review the settings to ensure they are correct.
9. Once you have verified the settings, click on "Create" to initiate the creation of the virtual machine.
10. After the VM creation process is completed, you can select "Create another VM" to proceed with creating the second virtual machine.
11. For the second virtual machine, name it "VM2" and replicate all the previous settings.
Connect to your VM
To connect to VM1 using Azure Bastion, follow these steps:
- Go to the Azure portal and search for "Virtual machines."
- Select "Virtual machines" from the search results.
- On the Virtual machines page, locate and select VM1 from the list.
- At the top of the VM1 page, click on the dropdown arrow next to "Connect," and then choose "Bastion."
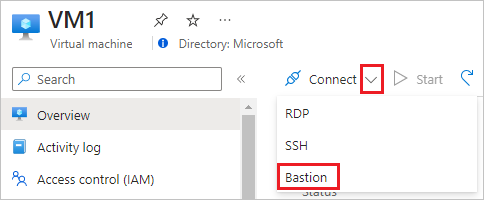
5. You may be prompted to provide additional authentication, such as your Azure account credentials.
6. On the Bastion page, enter the username and password that you previously created for VM1.
7. Once you have entered the credentials, click on "Connect" to initiate the connection process.
By following these instructions, you will be able to connect to VM1 using Azure Bastion.
To establish communication between VM1 and VM2, follow these steps:
- From the desktop of VM1, open PowerShell.
- Enter the command "ping VM2" in the PowerShell window. You will receive a reply similar to the following message:
PS C:\Users\VM1> ping VM2

Pinging VM2.ovvzzdcazhbu5iczfvonhg2zrb.bx.internal.cloudapp.net with 32 bytes of data
Request timed out.
Request timed out.
Request timed out.
Request timed out.

Ping statistics for 10.0.0.5:
    Packets: Sent = 4, Received = 0, Lost = 4 (100% loss),
3. The ping fails because it uses the Internet Control Message Protocol (ICMP), which is not allowed through the Windows firewall by default.
4. To allow ICMP inbound through the Windows firewall on VM1, execute the following command in PowerShell:
New-NetFirewallRule –DisplayName "Allow ICMPv4-In" –Protocol ICMPv4
5. Close the Bastion connection to VM1.
6. Repeat the steps in the "Connect to a VM" section to connect to VM2.
7. From PowerShell on VM2, enter the command "ping VM1."
8. This time you will receive a successful reply similar to the following message because you allowed ICMP through the firewall on VM1:
PS C:\Users\VM2> ping VM1

Pinging VM1.e5p2dibbrqtejhq04lqrusvd4g.bx.internal.cloudapp.net [10.0.0.4] with 32 bytes of data:
Reply from 10.0.0.4: bytes=32 time=2ms TTL=128
Reply from 10.0.0.4: bytes=32 time<1ms TTL=128
Reply from 10.0.0.4: bytes=32 time<1ms TTL=128
Reply from 10.0.0.4: bytes=32 time<1ms TTL=128

Ping statistics for 10.0.0.4:
    Packets: Sent = 4, Received = 4, Lost = 0 (0% loss),
Approximate round trip times in milliseconds:
    Minimum = 0ms, Maximum = 2ms, Average = 0ms
9. Close the Bastion connection to VM2.
By following these instructions, you will successfully establish communication between VM1 and VM2 by allowing ICMP through the firewall and verifying the ping connectivity between the two virtual machines.
Cleaning Up Resources
To clean up the resources when you no longer need the virtual network and VMs, follow these steps:
- Navigate to the 'Resource groups' section in the Azure portal.
- Locate and select the 'TestRG' resource group from the list.
- On the 'TestRG' page, click on the option 'Delete resource group'.
- In the confirmation dialog, enter 'TestRG' to confirm the deletion of the resource group.
- Finally, click on 'Delete' to initiate the deletion process.
By following these instructions, you will be able to delete the 'TestRG' resource group along with all its associated resources, including the virtual network and VMs.
We've reached the end of Part 2 of our series where we've explored creating and managing Azure VMs and setting up Azure Networking. In the next installment, we'll go a step further into these advanced configurations to maximize the utility of your Azure Virtual Networks. Stay tuned for more insights and guides!
If you want to know more about Azure Networking feel free to contact me:
Contact me via,
Mail: tycho.loke@peoplerock.nl
Phone: +31 6 39 41 36 65
LinkedIn: Tycho Löke

